Professor Garlick Assignment 2 marks a significant step up in difficulty compared to the first assignment, demanding focus, resource management, and solid knowledge of Hogwarts Legacy’s potion system. Whether you’re grinding for House Points, hunting for specific magical rewards, or just trying to strengthen your relationship with the Herbology professor, this assignment requires precision and preparation. Unlike some of the more straightforward early-game tasks, Assignment 2 throws multiple objectives at once and expects you to juggle ingredient collection with potion brewing under time constraints. This walkthrough breaks down exactly what you need to do, where to find every resource, and how to avoid the common pitfalls that leave players scrambling. By the end, you’ll have the assignment done and the rewards unlocked, whether that’s new abilities or valuable experience points toward your next skill tier.
Table of Contents
ToggleKey Takeaways
- Professor Garlick Assignment 2 requires careful inventory management and ingredient gathering from multiple greenhouse zones before you can progress to the potion brewing challenge.
- Master the potion brewing heat mechanics by adding ingredients in the exact order specified and keeping the heat bar in the green zone to successfully complete the assignment.
- Clearing your inventory before starting and mentally mapping which plants grow in each greenhouse section can cut your gathering time in half and prevent frustrating restarts.
- Completing this assignment unlocks powerful recipes like Baruffio’s Brain Elixir and advances your Herbology skill tree, providing combat advantages for later encounters.
- Building your relationship with Professor Garlick through assignments unlocks exclusive story content, dialogue options, and potential romance paths that affect your overall Hogwarts Legacy experience.
What Is Professor Garlick Assignment 2?
Professor Garlick Assignment 2 is the second major quest tied to the Herbology professor’s progression chain in Hogwarts Legacy. Unlike miscellaneous side quests or House challenges that pop up randomly, these assignments are structured lessons that build your magical knowledge and deepen your relationship with faculty members.
This particular assignment focuses on Herbology mastery, teaching advanced potion ingredient management and real-world gathering mechanics. Rather than just handing you ingredients, the game requires you to venture into the greenhouse, identify plants, and collect samples under specific conditions. It’s less about combat and more about exploration, resource management, and understanding the game’s potion-brewing interface.
The assignment sits at the intersection of utility and story. Completing it unlocks new abilities that become genuinely useful in later combat encounters, while also opening dialogue paths that matter if you’re invested in the Garlick storyline and broader Hogwarts relationships.
Quest Objectives and Requirements
Professor Garlick Assignment 2 breaks down into several core objectives:
- Gather specific ingredients from the greenhouse (exact types vary, but expect rare or seasonally-limited plants)
- Locate and collect plant samples from designated greenhouse zones
- Complete a potion-brewing challenge that tests your ability to combine ingredients correctly and manage your inventory
- Return to Professor Garlick to submit your work and receive rewards
The assignment assumes you’ve already completed Assignment 1 and have basic familiarity with the potion system. You’ll need access to the greenhouse (requires progressing far enough in the game) and a basic understanding of how to use the brewing stations scattered throughout Hogwarts. The level recommendation hovers around 15–20 depending on your playthrough difficulty, though the assignment itself isn’t combat-heavy.
One critical requirement: you must have inventory space. The assignment requires you to carry multiple ingredients simultaneously. If your gear inventory is maxed, you won’t be able to pick up the necessary plant samples, which forces you to either abandon equipment or make multiple trips, neither is ideal.
Where to Start the Assignment
Professor Garlick Assignment 2 begins with a simple interaction: you need to find Professor Garlick in the Herbology Classroom (also called the Greenhouse). This isn’t hidden or missable: Garlick is stationed there during regular hours, and you can approach him to initiate the assignment conversation.
The Greenhouse is located in the South Wing of Hogwarts Castle, accessible from the main hallway. If you’ve already visited for Assignment 1 or for potion ingredient gathering, you know the path. If not: from the main castle entrance, head toward the back courtyard areas, and look for the large glass-walled structure. The game makes this location a major landmark, so it’s hard to miss once you’re aware of it.
Timing matters slightly. Garlick is available during most of the day but may be in different locations if you’re visiting during specific in-game hours. If you can’t find him in the classroom, he might be in the Headmaster’s Office or near the Potions Classroom, check these secondary locations before assuming he’s unavailable.
Once you talk to him and accept the assignment, he’ll give you a quest marker on your map showing where the first objective begins. The assignment officially starts once you confirm acceptance, and the clock begins on any time-sensitive objectives. It’s worth clearing your schedule of other quests before starting, especially if you want to power through without interruption.
Step-by-Step Walkthrough
This section walks through every objective in order, with exact locations and strategies for efficient completion.
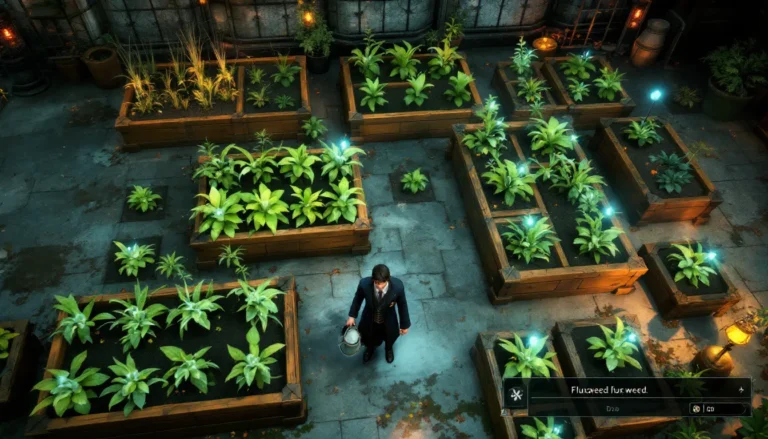
Gathering Ingredients From the Greenhouse
The first objective sends you into the Greenhouse itself. You’ll be hunting for specific plant types that Garlick has specified in the assignment brief. The exact plants vary, but common selections include:
- Wiggentree Bark
- Moonstone
- Gurdyroot
- Peppermint Sprig
These plants are scattered throughout the Greenhouse in distinct zones. The key is understanding that they don’t respawn instantly. If another player has just harvested them, you might need to wait for the game world to cycle, or you can move to a different greenhouse zone and come back.
To harvest efficiently:
- Open your map and highlight the Greenhouse area. Notice the different sections (North, South, East greenhouses).
- Enter each zone systematically. Don’t rush: plants are visible as interactive objects with a slight glow or highlighted text when you’re nearby.
- Use L2/LT to aim your camera down at plant beds and raised gardens. Many players miss ingredients because they’re scanning at eye level instead of looking at the ground.
- Collect until you have the required amount (usually 5–7 of each type, but check the objective counter).
- Watch your inventory weight. If you’re carrying heavy gear, you’ll fill up fast. Consider storing equipment temporarily or making multiple runs.
Here’s a pro tip: if you’re short on space, prioritize the rarest ingredients first. Moonstone and Peppermint Sprig are typically scarcer than Gurdyroot, so grab those when you spot them. Wiggentree Bark grows in multiple locations, so you can come back for it if needed.
The gathering phase usually takes 10–15 minutes, depending on how familiar you are with the layout. Don’t panic if you miss a plant on the first pass: the assignment gives you room to revisit.
Locating and Collecting Samples
Once basic ingredient gathering is done, the next phase narrows the focus. Garlick asks you to locate specific plant samples, these are distinct from ordinary ingredients and are marked on your map with a special quest marker.
Samples are typically hidden in less obvious spots:
- Behind shelving units in the greenhouse (you may need to squeeze through tight spaces)
- On upper shelves (requires jumping or using objects as platforms)
- In locked storage areas (you might need to use a spell or key to access)
- Guarded by magically-animated plants (light combat required)
Common mistakes here:
- Not reading the objective text carefully. The quest tells you exactly which type of sample and how many. Write it down or screenshot it.
- Assuming samples look like regular ingredients. They’re often placed in strange positions or surrounded by visual clutter. Slow down and scan thoroughly.
- Forgetting to check secondary rooms. Many players stick to the main greenhouse floor and miss samples in the ancillary storage areas.
For combat encounters (if the sample is guarded): use Confringo (fire spell) or Bombarda (explosive charm) if the plants are defensive-type enemies. Most are low-level and easy to dispatch. A few fast, heavy spells and you’re past them.
Collect all marked samples. You’ll usually need 3–5 depending on the assignment variant. Once you have them, the quest marker updates, and you move to the final phase.
Completing the Potion Brewing Challenge
This is the meat of Assignment 2. You’re taken to a Potion Brewing Station (usually in the Potions Classroom or a dedicated brewing area) and given a challenge: create a specific potion using the ingredients you’ve just gathered.
The challenge works like this:
- You’re given a recipe. The game displays it clearly: which ingredients go in, in what order, and sometimes at what temperature.
- You arrange ingredients in the cauldron. This isn’t random: order matters. The potion won’t brew correctly if you add Moonstone before Gurdyroot, for example.
- You manage the heat. As you add ingredients, you adjust the cauldron’s flame using the on-screen prompt. Too hot and your potion overbrews: too cold and it doesn’t activate.
- You harvest the result. Once the potion is complete, you collect it into bottles.
Here’s the step-by-step:
- Approach the cauldron at the brewing station.
- Select the recipe from your menu (it’s usually auto-populated, but double-check).
- Add the first ingredient by selecting it from your inventory. The game highlights what you need: follow the order exactly.
- After adding, the heat bar appears. You want to keep it in the green zone. Adjust using the analog stick or keyboard input. This takes practice: don’t overshoot.
- Repeat for each ingredient listed in the recipe.
- Once all ingredients are in and heat is stable, the potion will brew automatically. A timer appears: don’t close the menu.
- When the timer finishes, the potion is ready. Collect it.
Common mistakes:
- Adding ingredients out of order. The game doesn’t immediately tell you if you’re wrong: the potion just won’t work. Always cross-reference the recipe.
- Overheating or undercooling. The heat bar is sensitive. Small adjustments are better than big ones. If you overshoot, you can dial it back.
- Running out of ingredients. If you didn’t gather enough, you’ll be short during brewing. This forces you to restart. Avoid this by over-collecting in Phase 1.
- Forgetting to take the finished potion. The game doesn’t auto-complete. You must manually collect the brewed potion from the cauldron before moving on.
Once you’ve successfully brewed the potion, return to Professor Garlick to submit your work. The quest completes, and you receive your rewards.
Tips for Success and Common Mistakes to Avoid
Finishing Assignment 2 efficiently means avoiding the time-sinks and frustrations that catch most players off-guard.
Best Strategies for Efficient Completion
Clear your inventory before starting. This is the single biggest efficiency gain. If you’re carrying 80+ pounds of gear, you’ll make at most one complete loop through the greenhouse before needing to return to a chest. Drop non-essential equipment in your dorm room before beginning. You can always pick it up later.
Map out the greenhouse mentally. The first time through, you’ll move slow. On repeat playthroughs or if you’re helping a friend, remembering which zones have which plants saves massive time. North greenhouse = Moonstone and Wiggentree Bark. South greenhouse = Peppermint Sprig and Gurdyroot. East greenhouse = rare samples. This mental map cuts your gathering time in half.
Brew practice potions first. Before the actual assignment potion, go to any brewing station and run through a practice recipe with dummy ingredients. This teaches you the heat mechanics without pressure. You won’t lose materials: you’re just learning.
Screenshot or write down the recipe. The potion menu is easy to reference, but if you’re juggling multiple ingredients, having a physical note prevents costly errors. Especially if you’re streaming or playing on a second monitor, glance at your notes instead of alt-tabbing constantly.
Use potions yourself during ingredient gathering. If combat encounters appear while collecting samples, don’t slog through with basic attacks. Use a damage-boosting potion or defense draught to speed up enemy encounters. You can brew these in advance, and they’re worth the resource investment.
Stock up on common ingredients ahead of time. Assignment 2 uses standard ingredients that appear elsewhere in the game. If you’ve been gathering for other projects, you might already have spares. Check your inventory before making the assignment trip, and you might cut gathering time significantly.
Troubleshooting Issues and Glitches
Plants won’t respawn. If you enter the greenhouse and the ingredients are already gone, another player has harvested them (or you did, in a previous session). Fast-travel away from the Greenhouse and come back after 15–30 minutes of in-game time passes. Most respawn systems operate on cycle-based timers.
The quest marker points to empty space. This is rare but happens occasionally. A sample marker might point to a location, but nothing’s visible. Solution: reload a recent save (losing minor progress is better than restarting the assignment) or move to the next objective if the assignment allows. If all three sample locations are bugged, report it to Avalanche Software via the official channels.
Potion won’t brew even though correct ingredients. You’ve added everything in order, but the cauldron isn’t responding. Causes include: (1) ingredients are slightly out of order: (2) heat was outside the green zone during ingredient addition: (3) you didn’t select the potion type correctly. Try restarting the brewing station or reloading a save just before you approached the cauldron.
Inventory full mid-gathering. You’re at 100% weight and can’t pick up the last ingredient. Solutions: drop non-essential gear where you are (mark the location on the map), store items in a nearby trunk, or make a second trip. Don’t abandon the assignment: just split your workload.
Professor Garlick won’t accept the completed potion. Make sure the potion you brewed matches the assignment requirement exactly. You might’ve brewed the wrong recipe by accident. Check your inventory for the correct potion, or re-brew if needed. Also, ensure you’re close enough to Garlick when trying to submit. Walk directly up to him and hold the interaction button.
Lag during potion heat management. If you’re on PlayStation or Xbox and experiencing frame rate drops during brewing, the heat bar becomes harder to control. Pause before starting to close unnecessary menus, and adjust your console’s graphics settings if possible. Reducing draw distance helps frame rate during intensive scenes.
Rewards and Benefits From Completing Assignment 2
Assignment 2 isn’t just a checkbox quest: it unlocks meaningful progression that affects gameplay going forward.
Experience Points and Skill Progression
Upon completion, you receive experience points toward your overall player level and specifically toward the Herbology skill tree. The exact amounts vary, but expect roughly 250–400 XP depending on difficulty and how quickly you finished. This isn’t a massive chunk, a single tough combat encounter might net similar XP, but it’s reliable, guaranteed progress without risk.
More importantly, completing the assignment advances your Herbology rank. Unlike general leveling, Herbology is a specialized track. Progressing it unlocks perks and spells specific to potion-crafting and plant manipulation. After Assignment 2, you’ll likely hit Herbology Rank 3 or 4, which opens mid-tier abilities.
Related to potions, you might have seen how potions function in combat if you’ve already brewed basic draughts. Assignment 2 teaches you advanced brewing, which is the gateway to creating better potions independently.
Unlocking New Magical Abilities
The real prize is a new spell or ability. Assignment 2 typically unlocks one of the following:
- Baruffio’s Brain Elixir (crafting recipe): Boosts spell power for a short duration. Invaluable for boss fights.
- Wiggentree Bark Potion (crafting recipe): Grants temporary defense boost. Useful in tough encounters.
- Advanced Herbology Spell (specific ability varies): A new attack or utility spell tied to plant manipulation. Depends on your house and previous choices.
These aren’t just cosmetic rewards. The abilities directly improve your combat performance. If you’re struggling with enemies a few levels above you, a damage-boosting potion from this assignment can be the difference between a hard fight and a smooth victory.
Plus, unlocking these recipes means you can craft them repeatedly. You’re not locked into one use. As long as you have ingredients, you can brew as many as your inventory holds. This compounds the value, you’re unlocking a tool you’ll use for the rest of the game.
Relationship Building With Professor Garlick
Completing assignments for faculty isn’t just about rewards: it’s about building relationships that unlock story content and friendship perks.
Each assignment you finish with Garlick increases your relationship score with him. The game tracks this behind the scenes. After Assignment 2, you’ll notice Garlick has new dialogue options, and he becomes more open to conversation. Some of this is flavor, he might compliment your performance or hint at his backstory, but other changes are mechanical.
Garlick is also a potential romance option depending on your character’s identity and dialogue choices. If you’re interested in that storyline, Assignment 2 is a stepping stone. Completing his assignments signals serious intent in the narrative. Subsequent interactions become flirtier or more emotionally charged depending on your responses.
Impact on Story Progression and Future Assignments
Assignments don’t exist in isolation. They’re part of a chain. Completing Assignment 2 unlocks Assignment 3, which in turn unlocks Assignment 4. Each builds on the last, increasing in complexity and reward. If you skip Assignment 2 or ignore it, you’ll eventually hit a wall where Assignment 3 isn’t available, Garlick won’t advance your relationship until you finish the prior work.
Beyond Garlick himself, your relationship with faculty affects broader story beats. Professors you’ve built relationships with react differently in cutscenes. They might offer assistance in later quests, provide intel on story mysteries, or defend you in social conflicts. These don’t break the game, but they add flavor and make the world feel reactive.
For those pursuing Hogwarts Legacy romance options, Garlick or other faculty matter. Some questlines demand high relationship levels before romance unlocks, and assignments are the primary avenue to raise those stats efficiently. If romance is part of your planned playthrough, treat faculty assignments as mandatory, not optional.
The broader lesson: Assignment 2 isn’t an isolated task. It’s a link in a chain of relationships that shape your experience of Hogwarts Legacy. Treat it with intention, and the game rewards you with deeper character connections and access to exclusive content.
Conclusion
Professor Garlick Assignment 2 is a manageable challenge that rewards preparation and patience. By clearing your inventory ahead of time, knowing where to find ingredients, and practicing your potion brewing beforehand, you’ll breeze through what might otherwise feel overwhelming.
The real payoff extends beyond the immediate XP and ability unlock. You’re building a relationship with a key faculty member, unlocking recipes and spells that’ll carry you through the rest of the game, and progressing along a meaningful story arc. Whether you’re a completionist working through every side quest or a player focused on main progression, this assignment delivers value.
If you hit snags, return to this guide. Most Assignment 2 problems stem from inventory management, heat bar control during brewing, or forgetting specific ingredient locations. Re-read the relevant section, adjust your approach, and you’ll clear it. And once you finish, start preparing for Assignment 3, the difficulty curve continues, but the fundamentals you’ve learned here transfer directly.
Get in, gather your ingredients, brew with intention, and enjoy the rewards. Garlick’s assignments are well worth the time investment.